Датчик для этикеток UDST87
Ультразвуковой щелевой датчик этикеток UDST87I41CL
Описание
|
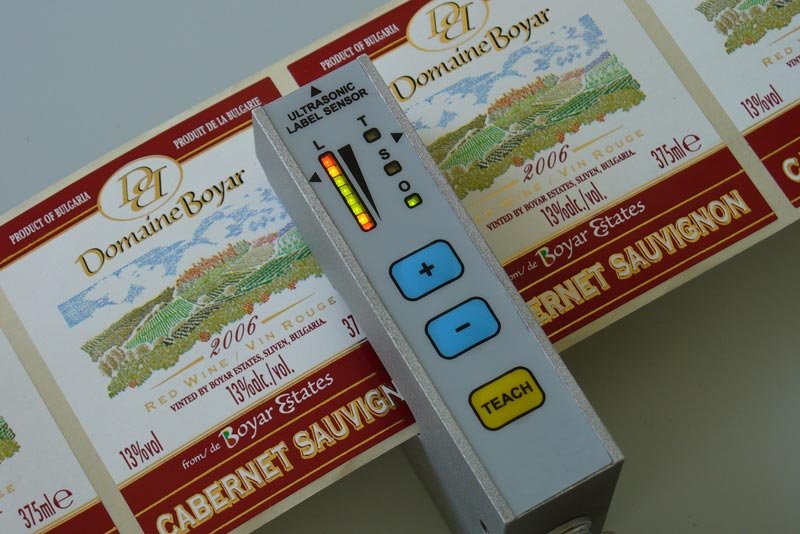
Датчик ультразвуковой для этикеток. Данная технология позволяет обнаруживать широкий спектр этикеток: с низкой контрастностью, прозрачные, металлизированные, горячей печати и т.д. Электрическое соединение позволяет выбрать тип (PNP или NPN) и функцию (NO или NC) выхода. Активное состояние выхода показывает светодиод “O”, а возможные перегрузки индикатор “S”. Настройку легко произвести благодаря наличию индикатора уровня обнаружения и функциональным кнопкам. |
 |
Technical data
- Supply voltage: 10 – 30 Vdc;
- Own consumption: < 0.1 A
- Time for initial location: < 1 second
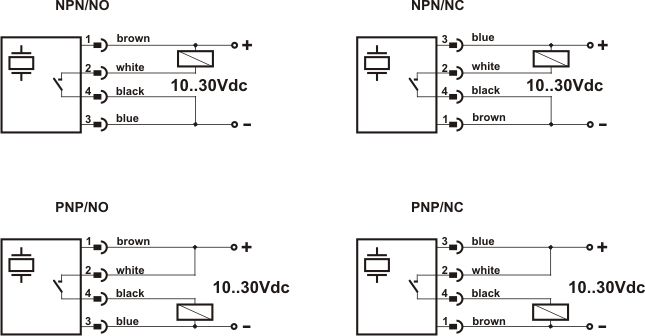
- Output: transistor,/ PNP/ NPN - by the circuitry/, fiber isolated, with an overload and reverse switch-on protection. The function NO/ NC is defined by the circuitry.
- Maximum applicable voltage at the output: +30 Vdc;
- Maximumresidual voltage: < 1,5 V;
- Maximumoutput current: 0,1 A;
- Maximum switching over frequency: 500 Hz;
- Maximum label width: 10 mm *;
- Maximum distance between the labels: 2,5 mm *;
- Maximum belt speed: 200 m/min *;
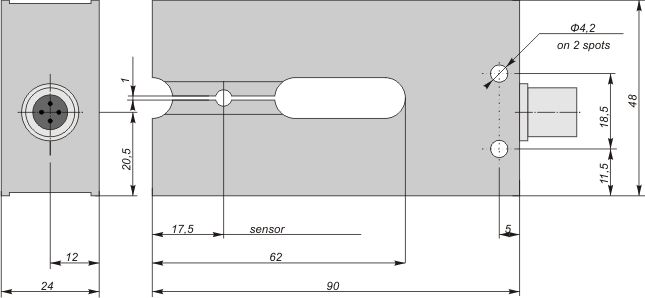
- Groove depth: 62 mm;
- Groove width: 1 mm;
- Center of sensible zone: 17,5 mm away from the body offset
- Indication: LED:
- 'T' /'teach'/ - yellow LED- ‘teaching’ mode, functional;
- 'S' /'status'/ - red LED- overloaded output, functional;
- 'Î' /'output'/ - green LED- active output, functional;
-'L' /'level'/- detection level indicator;
- Buttons: 3 – for setting the sensor;
- Electrical connection: coupling M12- 4 pins; /coupling M8- 4 pins **/;
- Mechanical connection: 2 through holes ø 4,2
- Dimensions: 48 x 90 x 24 mm;
- Material: aluminum, polyester
- Operational temperature: 0 .. +50 °C
- temperature: - 20…+ 80°C
- humidity: 0 … 85% RH
*- depending on the base material
**- by request
- when mounting, the label must be covering the sensor part to the maximum;
Overall and connecting dimensions

Connecting circuits

Automatic setting /recommended!/
 |
The sensor and the belt with labels must beat rest during the setting!
When the LED "T”goes out, the automatic setting is complete. If there is an insufficient signal level at the sight hole /after step 2/ or if there is an insufficient difference between the signals sight hole-label / after step 4/, then the level indicator starts to twinkle- indicates an error. This condition could be resolved by a new /correct/ teaching or by supply switch-off. |
Manual change of switching over limits/performed by an authorized specialist/
In this mode, the sensor gives an opportunity for a manual change of amplifying the input signal, threshold operational level and hysteresis.
This has to be performed only in cases when an automatic setting for a particular kind of label cannot be done.
The access to manual setting is carried out by pressing and holding for more than 3 seconds the buttons +−/simultaneously/.
The LED "S” lights up- change of amplifyingthe input signal. The buttons are then released.
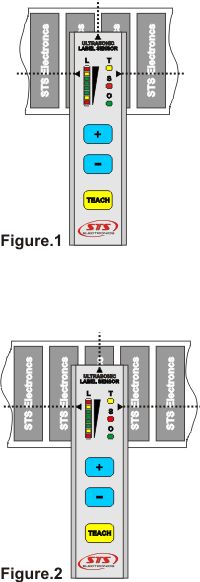
The belt with labels is being positioned at a sight hole of labels- fig.1, taking into consideration the markers on the front panel. Adjustment is performed step by step /16 levels/ by pressing button + for increasing, and by pressing button – for decreasing. When pressing a button, the LED "S” goes out. After releasing the button, a change of increasing coefficient begins until reaching the next level. It’s indicated by LED "S” lighting up. The end positions are indicated by a 10-time twinkle of "S”.
When positioning the belt onto a label, the second signal level is being noticed on the detection level indicator, and it’s needed for adjustment rating of threshold operational level.
Setting the next parameter- operational threshold- is done by pressing the button teach, LED "S” goes out. When the button is released, the LED "T” lights up- changeof the operational threshold. The level indicator indicates the operational threshold. It’s necessary to be set between the already reported two signal levels. Adjustment is performed step by step /16 levels/ by pressing button + for increasing, and by pressing button – for decreasing. When pressing a button, the LED "T” goes out. After releasing the button, a change of operational threshold begins until reaching the next level. It’s indicated by LED "T” lighting up. The end positions are indicated by a 10-time twinkle of "T”.
Setting the next parameter is done by pressing the button teach, LED "T” goes out. When releasing the button, the LEDs "T” and "S” light up simultaneously- change of hysteresis. The width of the hysteresis is being indicated on the level indicator. Adjustment is performed step by step /16 levels/ by pressing the buttons + and -. By pressing a button, the LEDs "T” and "S” go out. After releasing the button, the change begins until reaching the next level. It is indicated by lighting up the LEDs "T” and "S”. The end positions are indicated by a 10-time twinkle of "T” and "S”.
Ultrasonic sensors are intended to work in normal weather conditions, in an environment with no aggressive liquids and gases to the body materials and to the cable.